
[caption id="attachment_2094" align="aligncenter" width="690"]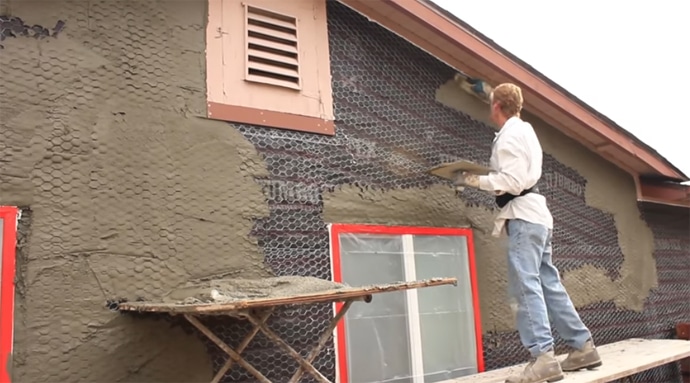 Image Source: Kirk Giordano Plastering Inc. | YouTube Channel
[/caption]
Stucco Installation, Procedures and Guidelines
The following document is based on the 2010 FBC, FBCR, ASTM C926, ASTM C1063, and other Application Guides regarding Stucco installation, procedures and practices. This document is not all inclusive and does not cover all the requirements for compliant installation of stucco. This document is meant to be used as a guide to address some of the common installation and proper application issues found during field inspections.
Stucco Installation Over Masonry:
- Conventional stucco over masonry surfaces may be applied with two or three coats. Two-coat systems over masonry consist of: first coat = 3/8 inch thick and finish coat = 1/8 inch thick; or over cast concrete consist of: first coat = 1/4 inch thick and finish coat = 1/8 inch thick. Three-coat systems consist of: first coat = 1/4 inch thick, second coat = 1/4 inch thick, and finish coat = 1/8 inch thick over both masonry and cast concrete.
- When required by ASTM C 926, Section 5.2.2; an exterior bonding agent, conforming to ASTM C 932, shall be used on all masonry surfaces. In lieu of a bonding agent, a dash coat, roughing the surface, or metal lath are also acceptable methods for bonding.
- FBC 2510.3 Installation, references ASTM C 926 requires form ties or other obstructions (including masonry cut nails for clean out opening forms) to be removed or trimmed back even with the surface of the solid base. In addition, if the nails are to be trimmed flush and left in place, they need to be corrosion resistant as would be required for lath or other metal accessories, ASTM C 926 section 5.2 and C 1063 section 6.
Stucco Installation Over Wood:
- Conventional stucco over wood should always be applied as a three-coat system. Scratch coat =3/8 inch thick, brown coat =3/8 inch thick, and finish coat =1/8 inch thick. The scratch coat must be scored horizontally on vertical surfaces. Successive coats should be applied as soon as possible after the underlying coat has sufficient strength and rigidity to resist damage when the next coat is applied. A mist cure shall be maintained as needed for climatic conditions.
- Where structural wood panels are used for sheathing, a minimum 1/8 inch separation shall be provided.
- The weather resistant barrier (WRB) must be installed per Sections R703.6.3 of the Florida Building Code Residential and 1404.2.1 of the Florida Building Code. Where cement plaster (stucco) is to be applied to lath over frame construction, measures shall be taken to prevent bonding between the cement plaster and the water resistive barrier. A bond break shall be provided between the water resistive barrier and the cement plaster (stucco) consisting of one of the following:
1. Two layers of an approved water resistant barrier material, or2. One layer of an approved water resistant barrier over an approved plastic house wrap, or3. Other approved methods or materials applied in accordance with the manufacturer’s installation instructions. - Lathing shall be connected to the framing members 7 inches on center. Lath shall be attached to horizontal wood framing members with 1.5 inch roofing nails and to vertical wood framing members with 6d common nails or 1 inch roofing nails driven to penetration of not less than ¾ inch, or 1 inch wire staples driven flush with the plaster base. Staples shall have crowns not less than ¾ inch and shall engage not less than three strands of lath and penetrate the wood framing members not less than ¾ inch. The fasteners must penetrate the wood framing members not less than 3/4 inch and not be installed randomly in the wall sheathing.
- Expanded 3/8” Rib Lath shall be attached to horizontal and vertical wood framing members with nails or staples to provide not less than 1 ¾” penetration into horizontal wood members, ¾” penetration into vertical wood framing members.
- Lapping of metal plaster base. Side laps shall be secured to framing members. They shall be tied between supports with wire at intervals not more than 9 inches. Lath shall be lapped ½ inch at the sides, 1 inch at ends. Where end laps occur between the framing members, the ends of the sheets shall be laced or wire tied.
- Lathing shall be self-furring or furred out from solid bases and comply with ASTM C 1063, Table 3. Maximum on center spacing of framing members shall be no more than 24 inches. Lath weight should be minimum 2.5 lb/sqyd.
- Lath accessories shall have perforated or expanded flanges, to permit complete embedment in the plaster, and be designed to receive the specified thickness of plaster. Accessories include control joints, expansion joints, corner bead, casing bead (plaster stop), cornerite, weep screed, etc.
- Control joints (expansion and contraction) shall be installed in walls to delineate areas not more than 144 sq. ft. on vertical surfaces and 100 sq. ft. on horizontal surfaces. The distance between control joints shall not exceed 18 feet, in either direction, or exceed length- to-width ratio of 2-1/2 to 1. The ASTM standard requires the paper to be installed, continuous, behind the joint material and that lath shall not be continuous through control joints, but shall be stopped and fastened (wire tied) on each side of the control joint. All accessories must be installed to receive a minimum 7/8 inch application for a three-coat system over wood.
- Control joints must be continuous through decorative bands or other embellishments, so they will not restrict panel movement.
- Typical locations for control joints would include: off corners of windows, structural plate lines (expecting minimal movement) and junctures of dissimilar substrates.
- Typical locations for expansion joints would include: structural plate lines (expecting significant movement) and at structure expansion joints.
- Accessories and end laps of metal lath, where they occur between framing members, may be stapled or nailed to the substrate or wired; 9 inches on center for end laps and 18 inches on center for accessories.
- At the intersections of vertical and horizontal control joints, the horizontal control joint shall be cut to fit and butted to the continuous, uninterrupted, vertical control joint. Embed all accessory ends, angles, butts, and intersections in sealant at time of installation.
- In wood-frame construction, accent features (foam, accent strips, banding, and trim) should be installed over the brown coat, using adhesive and minimum fasteners penetrating the stucco. (See Recommended Practice Section)
-
Alternative methods: (accent features applied directly over metal lath)1. Accent features may be installed directly over metal lath when they are properly flashed or the WRB and lath extend over the top section of the accent feature.2. Accent features may be installed directly over metal lath when they are isolated from the stucco as prescribed in ASTM C 926, Sec. A2.3.3. This method may require a renewable backer-rod and sealant joint.3. A proprietary detail, using synthetic stucco and reinforcing mesh.NOTE: Details for alternative methods must be shown on plans and approved by the Building Official.
- The termination of the stucco at the base of a wood structure shall be per ASTM C-926, Section A2.2.2.
- A weep screed shall be installed per ASTM Standard 1063-06 section 7.11.5. See below:
- A foundation weep screed shall have a sloped, solid, or perforated, ground or screed flange to facilitate the removal of moisture from the wall cavity and vertical attachment flange not less than 3.5 inches long. The bottom edge of the weep screed is placed not less than 1 inch below the joint formed by the foundation and framing. The water resistive barrier and lath shall entirely cover the vertical attachment flange and terminate at the top edge of the nose or ground flange.
- Raw earth, grade shall be not less than 4 inches below the nose of the weep screed, paved surfaces shall be not less than 2 inches below the nose of the weep screed.
- Roof lines shall be not less than 2 inches below the stucco termination.
[caption id="attachment_2078" align="aligncenter" width="690"]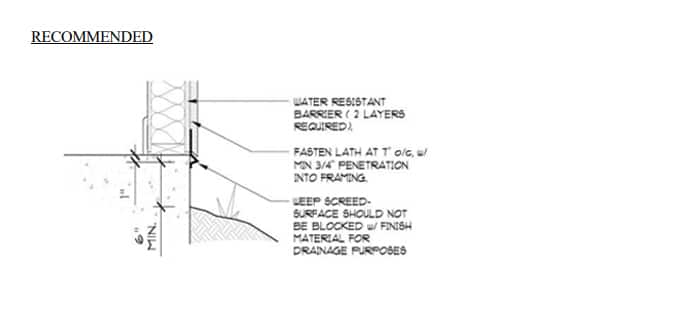 Image Source: http://www.irccdd.com/Applications/Stucco/Guidelines.pdf[/caption]
[caption id="attachment_2080" align="aligncenter" width="690"]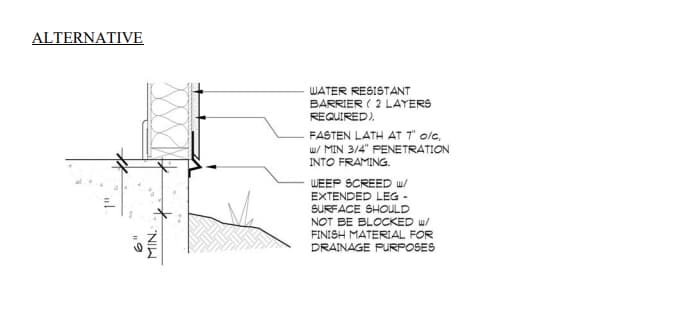 Image Source: http://www.irccdd.com/Applications/Stucco/Guidelines.pdf[/caption]
Please note the position of the wood structural panel (OSB or plywood), in the RECOMMENDED illustration. It is raised off the concrete and aligned with the face of the foundation. Care must be taken to construct foundation walls straight and true. In areas where the bottom of the wood structural panel is exposed, it shall have an ‘Exterior’ Bond Classification (‘Exposure 1’ is not rated for long-term exposure) or be otherwise protected as shown in the ALTERNATIVE illustration, or as approved by the Building Official. BOAF Informal Interpretation Number 2656, attached, may be used by the Building Official for guidance as to the intent of the Florida Building Code.
[caption id="attachment_2082" align="aligncenter" width="696"]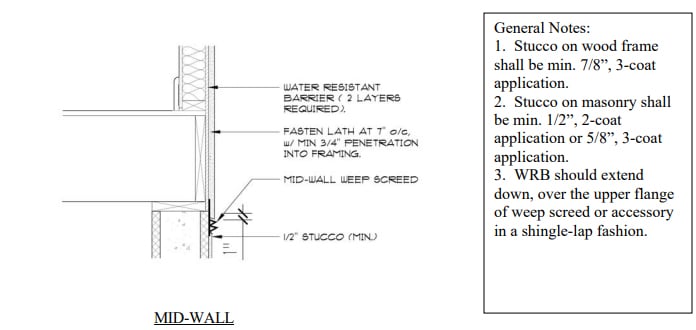 Image Source: http://www.irccdd.com/Applications/Stucco/Guidelines.pdf[/caption]
- FBC-R703.15 Drained assembly wall over mass assembly wall. Requires flashing or other approved drainage system (similar to the detail above), installed as required by section R703.8, at the base of framed walls over masonry walls. One-piece and two-piece accessories are available to meet this requirement.
- Separation shall be provided where stucco plaster abuts dissimilar materials, openings, and fenestration products and the juncture shall be sealed with sealant. See FBC-R703.6.5, R612.12 and ASTM C 926, Sec. 7.1.4.
- The weather-resistant barrier (WRB), bond-break, lath, and stucco shall be installed to the top of the wall top plate, including behind soffits. Where walls butt into perpendicular walls, rough framing shall not contact perpendicular wall sheathing; provide sufficient space to install continuous WRB, bond-break, lath, and stucco.
- 2010 FBC, Sec. R703.6.5 Fenestration states:
The juncture of exterior plaster and fenestration products shall be sealed with a sealant complying with Section R612.12. The documents referenced in Section R612.12 specify types of sealant and sealant joints, with backer-rod. This method of sealing joints around windows is the recommended practice.
Recommended Practice:
The following recommended practices, when carefully done, will provide enhanced protection against water intrusion into framed wall systems.
- Installing accent features (foam, accent strips, banding, and trim) over a proper stucco base coat (Scratch and brown coats) helps eliminate a major source of moisture intrusion. This method is highly encouraged and considered Recommended Practice.
- Installing a strip of self-adhering flashing or self-sealing membrane under trim, banding, and lath accessories (both vertical and horizontal) helps protect against water intrusion where fasteners penetrate the WRB.
- Self-furring, paper-back lath (made with 10-minute, Grade D paper) over house wrap meets all of
the requirements of the Florida Building Code. Self-furring, unbacked lath over two layers of WRB, consisting of a layer of 60-minute, Grade D paper (or better) over a layer of house wrap will provide enhanced protection against water intrusion. - When installing the WRB’s, care must be taken to keep the membranes tight into the corner, so the lath can be installed without puncturing the WRB’s.
- In multistory, frame construction, where stucco wall covering is continuous past a floor; a weep screed should be provided, with expansion/contraction capabilities, or other effective means to drain away any water that may get behind the plaster.
-
NOTE:
This guide was republished from IRCCDD.COM
INDIAN RIVER COUNTY/CITY OF VERO BEACH BUILDING DIVISION
1801 27th Street, Vero Beach, FL 32960
Phone: (772) 226-1260.
This guide can be read in its entirety here.
StuccoHQ.com is not associated with INDIAN RIVER COUNTY/CITY OF VERO BEACH BUILDING DIVISION in any way.Take a look at this very informative stucco installation video.
This article was curated from www.StuccoHQ.com
This article was reposted from https://www.StuccoHQ.com and could be read here: https://www.stuccohq.com/stucco-installation-procedures-and-guidelines/.
No comments:
Post a Comment